Monday, January 30, 2017

Pieced and Quilted Pillow Tutorial

I've been making a number of pillows lately and I love the feeling of piecing
 and finishing a project the same day! Well usually any ways.... and I'm calling mine mini quilts....
because let's face it, I've done the same work as if I was building a mini quilt, I just chose to turn this into a couch display instead of a wall display, lol!

This is my new block pattern L.O.V.E. and don't we all need more of that right now!
You can find it in my Craftsy Pattern Shop 


Well after making these last two Valentine's Day themed pillow covers, I thought it was time to just post a tutorial, incase you wanted to see my steps, and also my own personal reference map. Sometimes when there is too much time in between even I forget what I have done too, so this is my version of writing things down! 

Tips: 
  • If you plan on piecing and quilting a pillow cover, remember that during the quilting, your block will shrink, so add 1-2" to your block to account for that and give you room to trim your block back to square. So if your block is 18" and you want to make an 18" pillow, add a 1" border before quilting and trim to size after. 
  • I buy light coloured, cheap fabric to use for backings when quilting pillows. That way it doesn't add a lot of bulk and I don't feel bad that it is inside the pillow and no one ever sees it.
  • I like a tight pillow so I cut mine to the size of the form, so  12" form I would cut my front and back to 12". An 18" form I would cut my pieces to 18", and so on. If you wanted a looser cover, just add 1/2" to your overall measurements. (my pillow preference is 18" and 20")

18" Pillow Cover with flap covered Zipper Back:

Pillow Front:
Make a pieced front that is at least 1-2" bigger than your end pillow size. Quilt as desired. Trim to size.

Pillow Back:
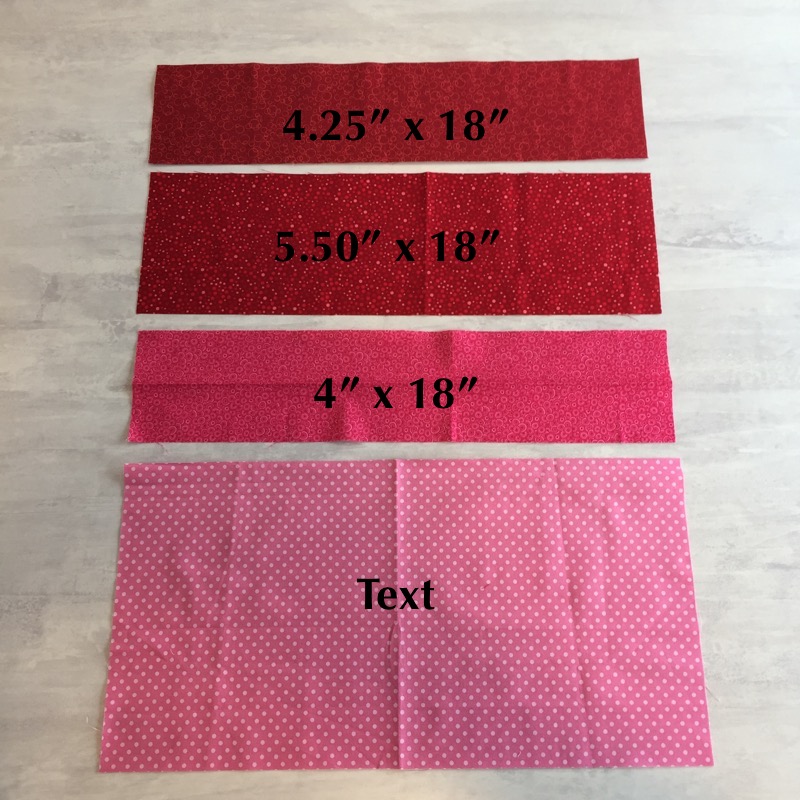
(2) 9.25" x 18" pieces of backing fabric

  • I have also pieced the back, by sewing 4.25" x 18" and  5.50" x 18" pieces of fabric together to form the 9.25" x 18" or any combination to get the end size listed. 
  • And using this formula you can figure out any sized pillow back: The size of you are cutting your pillow (for me the size of the form) 18" divided by 2 plus 1/4" for the zipper seam. So (2) pieces 9.25" x 18" (pillow form again.)

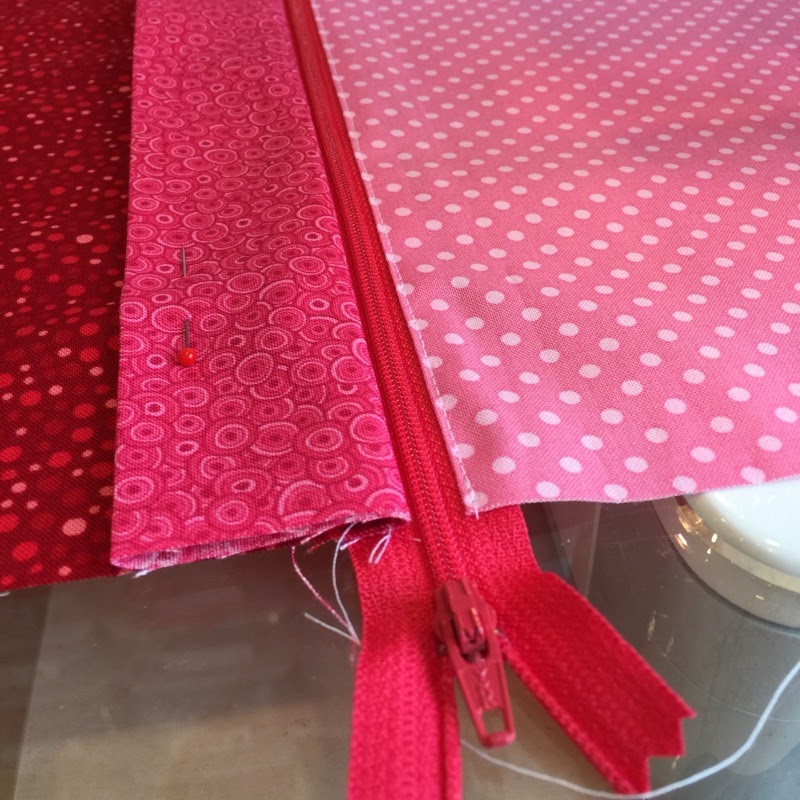
(1) 4" x 18" piece of fabric for the zipper flap
(1) 20" zipper (I tend to use a larger zipper and cut off the excess. That way you avoid dealing with   the metal ends.

1) Sew your pieces together if you are making a pieced back, and press your seam. Also press the 4" x 18" flap piece in half along the long 18" length. Making your flap 2" x 18".


2) Place the zipper right side down on top of the flap, matching the edge of the zipper tap with the raw edge of the zipper. Put a couple of pins in to hold or base stitch in place. Zipper should extend passed the flap at both ends.


3) Now place the flap and zipper onto the bottom edge of your top 9.25" x 18" pieces, matching the raw 18" edge and sides, so the flap is centred. Add a few more pins and using your zipper foot and 1/4" seam, sew the one side of the zipper in place.


4) Press the fabric back and topstitch.


5) Pin the flap out of the way and lay it over onto the second piece of backing RST, again matching the zipper tap to the top raw edge of the bottom piece and matching your sides. Pin zipper in place and stitch 1/4" seam.


6) Again press the fabric back and topstitch. Remove the pins from the flap.


7) Lay your pillow front RST with the pillow back, making sure your flap is facing down and your pillow is right side up. Also make sure the zipper is partially open and inside the 1/4" stitch line. Pin together matching sides and corners and add a quilt label if you have one! Stitch around the entire pillow using a 1/4" seam allowance.


8) Trim the zipper ends of and trim the corners, close to but not throw the stitching, to remove some of the bulk.


9) Turn pillow right side out and press.


10) Add pillow form and enjoy your pillow or mini quilt!!!
I'm calling this new block pattern 4 Times the Love and it can also be found in my Craftsy Pattern Shop. 


SaveSave

I Love PreCut Quilts Blog Hop Schedule


Welcome to the 
I Love Precut Quilts! Blog Hop Schedule

Hosted by C&T Publishing and Trish Maloney

The Blog Hop is a great way to find out more about what's in this 3rd book written by Trish. You'll hear blogger reviews, see projects and maybe learn more about the author herself.
It is also your way to possible win a copy of I Love Precut Quilts for yourself, as every blogger is hosting a giveaway!!
(This giveaway is hosted in the US by C&T Publishing, so international winners will receive a digital copy)


MONDAY, JAN 30

C&T Publishing (Tricia will be the guest blogger on C&T's blog to kick off the Blog Hop) 

TUESDAY, JAN 31

Mark Lipinski
Julie Cefalu from The Crafty Quilter
Bea Lee from Beaquilter

WEDNESDAY, FEB 1

 Sandy Whitelaw (You are Here)
Camelot Fabrics 
Cheryl Parker from Cheryl's Teapots2Quilting


THURSDAY, FEB 2

Joy Lamphere from Am I Shouting Yet?
Bernie Kringel from Needle and Foot

Generation Q Magazine

FRIDAY, FEB 3

Tricia Maloney from Quilt With a View 


The more bloggers you visit the better your chances of winning a copy of
I Love Precut Quilts becomes!!

And as a special bonus....I reached out to my blog sponsors
 and
 I have a few great sales discounts to share with you if you need...or
want to expand your precut stash!!!!!


which is constantly updated with their sales here, and sometimes share special discounts, like todays event (page tab at the top of my home page)


Enjoy the blog hop and don't forget to stop by all the participants to see what they thought of the book, what project they may have made and maybe learn a bit more about the author of the book herself!

See you back here on Feb. 1st for my day on the blog hop!!

Friday, January 27, 2017

Last Call for January Let's S.E.W. Link Up for Big Quilt Bee Blocks


You have till Tuesday January 31, 2017 at midnight 
to link up your slab blocks for the Big Quilt Bee, 1000 quilts for Ronald McDonald House

If you are just hearing about this event for the first time, you can learn more about it here.
You can find the block pattern here.

And the link to this months Let's S.E.W. Link Up can be found here.


Let's support a worthy cause and have some fun at the same time......
great way to use up some of your scraps and give back to a family in need.....

This month Rita from 

is giving away two $25.00 Gift Certificates to two lucky winners 
so get your blocks posted and thanks in advance for making this a successful event!!


Wednesday, January 18, 2017

I Love PreCut Quilts

I don't know about you, but sometimes I just want to make a quick project!

Sometimes I even need a quick project......

If you feel the same then you are going to want to come back for the 

I Love Precut Quilts Blog Hop!!!


And if the content of the book isn't enough to get you back to find out more.....

Every blogger will be having a giveaway on their blogs during the hop!

You might be lucky enough to win a copy of this book for yourself!!
(International winners, outside of the US, will receive an ebook. )

So mark your calendars and come back on January 30th!
 I will post all the links that day for you to use!!

Friday, January 13, 2017

Umbrella Table.... Dresden Topper

Here's a Tutorial I shared at Sew Sisters Blog back in 2015.....


Hi everyone, I'm Sandy from UpStairsHobbyRoom!! I'm a wife to my high school sweetheart, though we lived in different towns and didn't attend the same school, coming up on our 30th Wedding anniversary in July.  I'm a mother of 3 grown adults, a daughter and 2 sons, plus a son-in-law (no grand babies, yet), and I love country living. I have always loved crafting and creative outlets, and have sewn since I was about 11 or 12 years old, but I have only resently started quilting, about 3 ish years now.  I was super excited to be asked to join in on the Kona Club Challenge. I love Kona Cottons and I enjoy a good sewing challenge!!  I think I am still at the sponge stage, absorbing every new thing I can try, lol. Hope you are excited about the project and will try one for yourself, or maybe as BBQ host/hostess gift.
                            Happy sewing.....


Tropical Spin

Supplies

  • 4 FQs Kona Cotton, Main Fabric
  • 1 FQ Kona Cotton, Backing Fabric cut to 18" sq(or use your leftovers and piece an 18" square)
  • 18" Square piece of interfacing, fusible fleece (optional)
  • Dresden Plate Ruler, at least 7.5" (I used the Layer Cake Dresden, which if I did the math right is an 18 degree ruler...360 divided by 20 = 18. You can use any dresden, it just may affect the number of strip sets you will need, but there is plenty of fabric to work with here.) Just remember 360 divided by the degree of your dresden and that is how many plates you need to cut to get a full circle
  • 5" piece of 1/8 - 1/4" round elastic
  • 2 buttons


1/4" seams, press all seams open

Cutting Instructions:

  • Fabric 1: Cut (3) 3 1/4" x 18" strips (Mediterranean)
  • Fabric 2: Cut (3) 1 1/2" x 18" strips (Honeysuckle)
  • Fabric 3: Cut (3) 2" x 18" strips (Papaya)
  • Fabric 4: Cut (3) 2 1/2" x 18" strips (Grasshopper)


Sewing Instructions:

  • Sew one of each of the four different fabric strips together along the 18" edge to form 3 strip sets. Press


  • Using the dresden ruler, place the 7 1/2" line on the top edge of your strip set. You will notice that there is about 1/4" extra at the bottom of your ruler (narrowest end) that's good. This will make the inside hole about 3". Making sure the ruler is as close to the end of the strip set as possible, make your first cut. Now flip the ruler around and line up the 7 1/2" line on the bottom edge and the side with the previous cut and cut your second plate. Continue like this, flipping back and forth and making sure the extra fabric is always at the narrow end, until you have cut 20 plates or the number you require.


  • You now should have 2 sets of 10 plates. Divide them into 2 piles (trust me, or you will be having an unexpected date with your stitch ripper, lol) side by side right sides up. Now consistently lay the plate one onto plate two and sew down the right side. (at least there are no matching seams to worry about, :) Check to make sure your plates are staggering and continue joining the plates till the very last seam, do not join this seam. Press.


  • Take your 18" square of  interfacing or fleece and fuse it with the backing according to manufacturers instructions.

  • Lay your backing square right side up and place the topper right side down on top. Make sure the topper is centred and all edges are within the backing square and pin securely in place. Cut away the extra backing fabric.


  • Starting at one of the flat dresden sides, stitch all the way  around the topper, leaving a 4" opening for turning. Clip the corners and curves, careful to not clip through stitching. Turn and press, tucking in the extra fabric in the opening. 


  • Make elastic loops by cutting the 5" piece of elastic in half. Fold each piece in half and stitch close to the raw ends to make a loop. Slip the raw end of the loops into the opening, one at the top the other at the bottom, leaving enough loop exposed for your button size and enough inside to be caught by the topstitching. Pin in place.

  • Topstitch 1/8 - 1/4" all the way around the dresden catching the elastic loops and the opening as you go. (Add more topstitching or quilting as desired) I topstitched 1/4" on all sides of the dresden after going all around the outside, stitching over the previous topstitching in spots, in one continuous line around.


  • Mark the spots where the elastic sits on the opposite side of the dresden and sew on your two buttons. 


That's it...Enjoy
Sandy@UpStairsHobbyRoom

Use #UmbrellaDresden
if you share on social media
we all want to see what you come up with!!

Monday, January 9, 2017

Let's Sew Link Up.....

Oops, I am a few days behind on January's Let S.E.W. Link up.....

(If you want a button for your blog, click on the page tab above to find one!)

My Christmas decorations are still up....no judging, right? 😂

And my new sewing room still isn't organized.....yikes....

But........

I've made a promise to myself (not a New Years resolution, 😉)

This year I am going to use my time wisely and finish all those quilt tops that are in a pile in my bedroom. It is sad but true, I am easily distracted by the next fun project, pattern, material....
Which means lots of quilt tops are made but sadly less actual quilts, but no more.....

I am off to a good start too....if you don't take into consideration that the first project I completed in 2017, I started in 2017, while quilt tops from as far back as 2013 (maybe even 2012😳) sit unfinished. In my defence I was asked to be a part of a book review, I Love PreCut Quilts,  for CT Publishing, so I had to get that done✅ (blog hop runs at the end of the month and I will be giving away a free copy of the book...so don't for get to come back!!)

(I used a fun Moda print for my precut project)


I also managed to get my Wiggle Me Colourful Quilt, quilted today. I still have to bind it and I think I will be adding some hand quilting to this one...I've never done that before, so wish me luck.
I'm not going to say I made a mistake, but I set the digital E2E at 14" without really considering the size the hearts would be....lol....and my closed hand almost fits inside the heart....so just to make sure I don't have any issues I'm going to add some hand stitching. (it's not a mistake, because I love this idea...so it was just meant to be....)


I especially think the hand stitching will add so much visual interest to the back!!

Oh, I am going to use you all to keep me true to my promise, if you don't mind?

I did a complete count of the finished quilt tops...23 including the Wiggle Me Colourful above...
So right now I am at 1/23 done. My promise, besides using my time wisely, is to load a quilt on at least 2 Mondays a month for the year. If I do that I should have them all quilted by the end of this year. Isn't that just crazy...that I have enough quilt tops just sitting it could take a year to quilt them all....bad on me.....and that I will probably (and you know I will) keep making more this year, lol .......so it's an ongoing battle to start and finish every quilt top and not have a pile......
may never happen


Ok, enough about my issues.....
Let's get on with the link up

Reminder....the Let's S.E.W.  is being combined right now with the BigQuiltBee
You can read all about the bee by clicking on the page tab above.


Each month Rita from Fabric Please is generously donating a $25 gift certificate to be awarded randomly to one of you who link up your bee blocks.
With Christmas and the fact that I did start my link ups early, there were no bee blocks linked up in December, so January's link up will now be for (2) $25 GC!!!!
So get sewing and link up your blocks....spread the word 


And The Winners Are.......
Brenda and Jannette are the winners of the two $25 Gift Certificates from
Fabric Please!! Thanks Rita!!

*this post contains affiliate links