Friday, September 30, 2016

One Block Wonders Final Link Up and GiveAway

Well it's that time....the One Block Wonders BOM is wrapping up. 
I hope you have enjoyed the year and the final block!


It has been a lot of work, and a lot of fun. 
I have learned so much, virtually met some great people, and I have loved seeing my designed through your creations.

Rainbow Stacks Quilt

I couldn't have done it without all of you

Shattered Quilt

Topographical Quilt
Brilliant Clusters Quilt


or without all the support from all my fantastic Sponsors.....
Please don't forget to stop by their FB pages and let them know how much you appreciated them during the One Block Wonders BOM!!


Fabric Bundle


Fabric Bundle


$50 Gif Certificate


Fabric Bundle Cheeky Pumpkins


$30 Gift Certificate


Fabric Bundle


$25 Gift Certificate


I am working on getting all the full sized patterns written up and posted in my Craftsy Pattern Shop, so if you aren't following my blog you might want to either follow by email or bloglovin to keep up to date on what's happening and pattern releases! Either option is in my sidebar. ;)

Blessing Quilt
Around the Block Quilt
Hugs & Kisses Quilt
One Plus One Quilt
Diamond Path Quilt
May Blooms Quilt

That's most of the patterns and quilts from our One Block Wonders BOM journey...
some have some have been gifted, one donated to a good cause, and a few still need to be quilted....

And a couple of them are on their way to Quilt Market in Houston in October!!! So excited about that!! ( if you happen to be their and see them link me in on an IG picture @upstairshobbyroom)

Link ups are below, I can't wait to see what you have created with this months block....

Thank you all again from the bottom of my heart for making this year amazing!!


Just a few tidbits of information.....
Everyone is welcome to enter the Rafflecopter giveaway, though some of the prizes are only available to be shipped within Canada and US, I will randomly draw names and figure it out by location!!

All my sewers make sure you link up your block or project, and let me know in the Rafflecopter giveaway for extra draws!! 

The contest is running for 2 weeks and you can enter everyday for more chances....look for that option in the Rafflecopter!!

I may not reply to every comment, but know that I have read them and appreciate you coming by and celebrating with me! If you ask a question, know that I will answer!!


a Rafflecopter giveaway


SaveSaveSaveSaveSaveSave

Monday, September 26, 2016

My UpStairs HobbyRoom is expanding....

I am doing my happiest, happy dance 💃🏻today!!!

I mentioned awhile back that my sewing room was going to get a renovation....and it's starting today!!


I couldn't be more thrilled! My space is lovely, but my fabric stash is taking over, and my work areas just aren't "working" anymore. 


So I am busting through the wall (and when I say I, I mean the builder, lol) and taking over the other attic space (second dormer), for fabric storage and another work space area. I feel so blessed!


Today starts with prep work for installing beams to make the floor safe and strong. Then some floor joists, a little truss work to give me head space and use of the dormer area....

Once my new room is ready and the base cabinets from my hobby room have been moved into the new area, I'll be adding sewing tables from EddyCrest Furniture to my hobby room. If you haven't seen Adam's creations, you should check them out. Made here in Canada, but also available in the US and more!!
2 of these short right sewing desks will be coming my way soon!!


Not much to show you at this point but I will keep you up to date with progress pictures as all the fun happens. Follow along over on IG too,  at uptairshobbyroom.


They are going to be doing as much work from the hatch as they can so they don't have to open up the wall until the drywalling has been done! I very much appreciate that effort,  keeping the dust out of my sewing room/sewing machines and the rest of my house!!! 

That's all my news...still have a huge smile on my face and I feel like a kid waiting for Christmas!!

Enjoy your day 
and don't forget the big link up for our final One Block Wonders and give aways starts this Friday, You don't want to miss this!
So don't forget to come back!! If you aren't following my blog check out my side bar, you can sign up with email or Bloglovin and never miss another post!


Thursday, September 22, 2016

One Block Wonders Rainbow Stacks Quilt Check In

It has been a very busy month....and it has flown by so fast.....
I can't believe it is only a little over a week till we will have our last link up...
And our One Block Wonders BOM journey will come to an end!


It has been so fun getting to know some of you and your lovely projects! We've had an audience and some very faithful followers and participators....and for you all, I want to take a minute to say, 
How much it has meant to me to have you along for the ride!!❤️

I also wanted to say that I have seen some of your Rainbow Stacks Quilt blocks and projects on IG 
and within our FB Group
and I am loving the colour and fabric combinations!!

Here's my quilt top, just deciding on the border finish...


After spending a few days getting my blocks together, I thought it might be a good idea to share some tips for putting your blocks together ....
I have to be honest and say, I was thinking these blocks might be more challenging to get together, but I'm so happy to say they went together very easily....

Tips on joining your blocks:
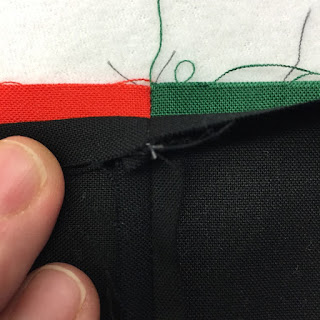
When you start joining your blocks, especially if you choose to make a larger project, and depending on you block layout, your blocks seams could come together with a few different matching possibilities. 

1.) Your standard seam match. 


2.) A cross seam, where two angles come together and cross at the seam. ( you want them to be crossing at that 1/4" mark)


3.) Where two angles are matching up perpendicular to each other. 
  
Here's the trick, no matter which way your seams align.....roll the top block seam back and look where your seams lines up at the 1/4" mark. It only matters what is happening here, if you have all your other edges aligned properly. 
I like to check twice, making sure my edges have stayed aligned and use a pin. (If I want my seams to match, I always use a pin!!) If you think your pieces shifted when you put your pin in, remove the pin and redo the seam....it will get easier....with practice! If you really are worried you aren't matching a particular seam right...put a pin in where the stitch line will be at a 1/4" to test. Flip your top piece back to look at the mock seam and see if you are aligning your seams properly.

That's it! Good Luck and Happy Sewing!!


Here's our final schedule...
The Link Up will go live on 
September 30 and run till 12am EST. on Oct. 10. 
As well there will be a Rafflecopter link up 
open to all blog visitors, 
to participate in our largest giveaway of the year !!!

Featuring Prizes from


Can't wait to see your projects....
Meet back here on Sept. 30 at midnight!!


Tuesday, September 20, 2016

Adding A Hanging Sleeve to Your Quilt Project

I've made a few quilt projects that were meant to be hung on a wall and I've used squares of fabric folded in half and sewn into the top corners during the binding process, which works if the piece is small, but the centre can buckle if it's too wide. I've also just pinned minis to my wall....


This also works great as a label for your quilts when you want to include more than just your name!
I draw lines using a frixion pen and then write what I want in a permeant marker and press with an iron to remove the lines.


Well, this time I was writing a new quilt pattern and I thought it was time to up my game and look into how you go about adding a hanging sleeve....
I found a lot of great information on adding a sleeve for quilt exhibits, which all seamed a little excessive for my small wall project for home use...

Then I came across this little PDF sheet from Martingale and it was exactly what I was looking for!!

Instructions:

  1. Cut your fabric for the sleeve 6"(to 8") wide by 1" shorter then the width of your quilt.
  2. Make a hem on the 6" wide edges by turning the raw edge under 1/2" and pressing, then turn under another 1/2" and press.
  3. Topstitch.


    4.) Fold your fabric in half, wrong sides together along the long edge, and base stitch 1/8th" from  
         raw edge.


     5.) Centre and pin the sleeve to the top edge of your quilt.


     6.) Proceed with binding your quilt. Stitching through all layers when you sew along the top edge,
          securing your sleeve in place.


     7.) Stitch your binding down on the backside of your quilt. I hand stitch mine with a blind stitch.
 

I found this great YouTube video that shows the blind stitch if you are no familiar with it.


     8.) To secure the sides and the folded edge of your sleeve you need to hand stitch with a blind
           stitch, but before you do that, push the folded edge of your tube up about a 1/4" to create a D
           shape. Pin in place and stitch down the short side, across the long edge and up the other short
           side to secure your sleeve to the back of your quilt! Be careful to only stitch through
           the backing layer of your quilt. You don't want your stitches to show on the front of your quilt.


That's it, easy, peasy!! And from now on my hanging projects will not only look more polished, but will hang properly....😀